How to take screenshots on windows 10
Want to take a screenshot of your PC or laptop? You have come to the right place. In this article, we will show you how to take screenshots on windows 10, Windows 7 or Windows 8.
If
you are at school or going to college, you might have to take a few screenshots
to finish up your school or college project. Not only that, if you are going to
post an article to your tutorial blog post or running a YouTube Channel, you may
need few screenshots to present your content in a better way.
Without
beating much about the bush, let us come to the main discussion here. We will
see the possible ways to get the screenshots of your PC or laptop so
easily.
When we work with our computer or laptop there are some time when we need to capture the screen, or in simple terms, we need to take a screenshot of the PC screen.
Let us discuss how to take screenshots on windows 10
Here
we will show very shortly how to capture a screenshot on Windows PC. If you
face any issues to understand these below procedures, please read the full
article till the end to know about more settings and options to capture the
screenshots on windows PC.
1. Find the PrtSc Key on your physical or onscreen keyboard. This PrtSc or sometimes marked as PrtScn Key's location on the PC might defer depending on the brand of PC you are using. Click PrtSc >> Open Paint App >> Press Ctrl + V >> Save/Save As
2. If option 1 does not work, then Press Windows Button (W) + PrtSc together then follow same instructions as described in option 1
3. Search Snipping Tool >> Open Snipping Tool >> Click on ‘New’ (Top Left of Snipping Tool) >> Select Screen to capture screenshot>> Save As (File option) or Copy (Edit Option)
Method 1: Windows Button (W) + PrtSc
PrtSc
is the inbuilt key on most of the keyboards nowadays. This key resides on the
keypad either as an individual key or as coupled with other keys in the first
line (or near the Number keys). Wherever it be, we can use this key to take a
screenshot of our PC. Now, it is to be noted that, though all these below
methods are correct, some of them might be OS-specific only. So, if one of the
methods does not work for your PC, try the other methods.
1. Hold Windows Button (W) + PrtSc together. If this does nothing, then Press only PrtSc button.
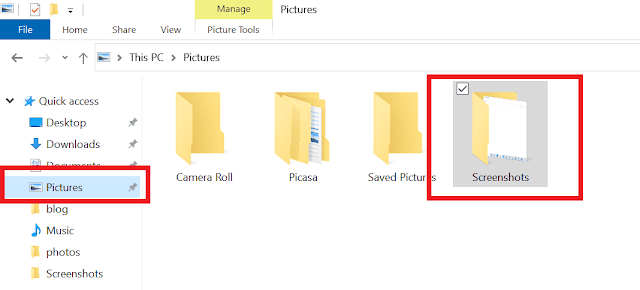
2. The screen will be dimmed and the screenshots will be saved in “C:\Users\...\Pictures\Screenshots” folder. Or else a few options will be popped up on the top of the screen of the PC.
3. Using those options, you can take the screenshot in rectangular format or in the freeform clip as you want or the full-screen screenshot of your PC.
4. Select any option and drag over your PC screenshot (the part you want to take a screenshot of), and the screenshot will be automatically saved in “C:\Users\...\Pictures\Screenshots” folder.
5. Now you can go to that Screenshots folder and edit the screenshot according to your need
Method 2: PrtSc + MsPaint
This procedure involves two different inbuilt applications, i.e., PrtSc and MSPaint.
The former one will capture the screenshot, and the latter one will help you
edit and/or save the screenshots in any location on your PC with ‘Save’ or
‘Save As’ option.
1. Press the PrtSc button on the Keyboard. This will copy the screenshot in the clipboard.
2. Open MS Paint (or shortly Paint).
3. And then press Ctrl+V to paste the screenshot in the MsPaint App.
4. In MsPaint you can edit the Screenshot as required and then go to File >> ‘Save’ or ‘Save As’ option to save the screenshot in any folder in any format you want to.
Method 3: Snipping Tool
If
nothing works; this will surely be working to any version of the OS available in
your PC.
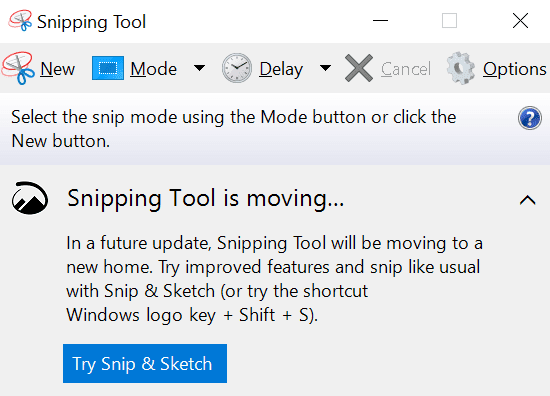
1. Go to start or press Windows Button (W) and search for Snipping Tool. Once the result is seen in the search results, click on the Application.
2. The application will be opened as below photo. This software comes with few options on the top bar. To take Screenshot we do not have to worry about all the options but the first one.
3. Click on the first option ‘New (Scissors Symbol)’ and your screen will be dimmed. You can drag your mouse over your desktop screen to select the area you want to take the screenshot for.
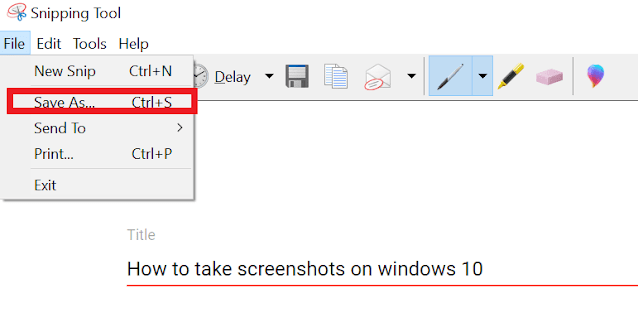
4. Once the area is selected Snipping Tool will give few options. Out of that Click on File >> Save As (or Press Ctrl+S) to save the file in your preferred location with preferred Format.
5. Before saving the photo from Snipping Tool the screenshot can be edited too if needed.
6. The screenshot can be copied from the ‘Edit’ option of Snipping tool to paste it in some other Tools or software like MS Office Word or Paint to further use.
Setting related issues to take screenshots on windows 10:
Generally,
PrtSc key is by default enabled in each PC to take the screenshots of the PC. But
unfortunately, If PrtSc or (W +
PrtSc) does not work on your PC, you might want to take a look in your PC
settings.
1. Click Windows Button (W) or go to search (near Windows Symbol W) and directly type ‘Ease of Access keyboard Settings’.
2. Select the Option in the search Result ‘Ease of Access keyboard Settings’.
3. Look for the option ‘Print Screen shortcut’ and toggle the Option if it is not done already.
Last Line
Taking a screenshot in Windows PC is really an easy-peasy job, but it is not known to everyone. So, after reading this article, you can now easily take screenshots, edit, and use them for your project or blog post, or tutorial.
If you face any difficulty capturing the screenshot in your Windows machine, please comment or reach out to us. We will be pleased to help you out.
Hope this article about taking a screenshot on Windows PC or Laptop is helpful to you. Have any computer or internet-related doubts or queries in mind? Want to read more about computer-related tips and tricks? Please do visit our blog regularly. We write quality content in detail with Screenshots to help them in a better way.


No comments:
Post a Comment