TechKnowTalkies: & More

Search This Blog

Showing posts with label & More. Show all posts

Sunday, July 11, 2021

How to Download Instagram DP in Full Size with Phone or Computer | 2021

Ever wanted to search for someone on Instagram but eventually got frustrated because the account may be private and DP shown in the search results are too small to understand who they really are? Or, at times, you receive a follow request, but you can not recognise the person who sent it because their account is private and the photo in the DP is too small. Or sometimes, you may want to save your own DP or your crush's picture onto your phone. 

Download Instagram DP

At this moment, some tricks to see the Instagram DP in full size may come to your rescue. Now, this article will show you how to download Instagram DP in Full Size.

Trick 1:

This is an evergreen feature of saving any picture from the internet. Except few all websites or applications have this feature available to save the photo by "right-click >> Save image as" option.
  1. Open Instagram.com on your computer web browser.
  2. Search for the name or ID in the Search Tab.
  3. Click on one of the suggestions.
  4. Right-click on the profile picture. Go to the 'Save image as' option and save it. 
If you do not have your computer handy and are using a smartphone, you need to do something tricky. 
  1. Open your phone browser(Chrome or Firefox) in Desktop Mode. (If you do not know how to do it, please follow this link)
  2. Now follow the first part of Trick 1
  3. If opening instagram.com on mobile redirecting you to the installed Instagram App(where you can not download any DP), open the browser in incognito/private mode. This will prevent the browser from being redirected to the installed App.

Trick 2:

  1. Open Instadp.com from your smartphone or computer browser.
  2. Search for the name (or ID if you know).
  3. From the suggestions, click on any ID.
  4. The profile will be opened with a full-size picture of the DP. (At this stage, a 4 seconds Ad may pop up. Do skip it after 4 seconds)
  5. You can download by clicking the 'download' option or by right click >> Save image as' option.
Except for these two methods, there are other websites where you can view DP in full size or download them. To name a few: izuum.com,  wizblogger.com, instadpdownloader.com, etc.

image source: google.com

Saturday, July 10, 2021

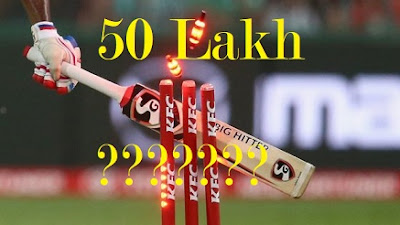
Why LED Cricket Stumps Cost 50 Lakh | Read Here How They Work

Every cricket lover can feel the thrill when bowlers uproot the stumps with their vicious Yorkers. The bails come off, and stumps and bails start glowing. The umpire raises his hand, the batsman is declared out, and he has to walk back to the pavilion. Sounds good?

However, there are certain moments, like run-outs, when it is crucial to know at what moment the bails have been dislodged. During close calls, the decision of batsman being out or not out depends on that. Earlier, the moment of dislodging of bails was decided by the judgment of umpires and that might have resulted in speculations over the decision. But not anymore.
stumps

This blog will give you a technical understanding of what is going on behind this wonderful technique.

Bail
Bronte EcKermann of Zing International came up with a set of stumps and bails which start glowing the moment bails are entirely dislodged from the stumps. This makes it easy for the umpires to take calls in run-out decisions. It is claimed that the sensors react within 1/1000th of a second after they have been dislodged,, thus eliminating chances of any error in judgment.

Light Sensor and LEDs
The circuit of bails contains one light sensor at each end and a LED circuit inside it. When they are placed over the stumps, the light sensor cannot get any light, and hence the LED circuit is incomplete.

The moment they are entirely dislodged, the sensors get light, LED circuit gets completed, and the bails start glowing.
A similar kind of circuit is provided in the stumps as well, but with the light sensor at only one end. Whenever the bails are taken off, the light falls on the sensor and stumps the light up.

While the Zing wickets look pretty elegant and help in better decision-making, they are pretty costly. Each system of wickets and bails used in international games costs about Rs. 25 lakhs. So no more taking home stumps after winning the match!


Image source: google.com


Friday, July 9, 2021

Generic comparisons between different mobile chipsets | 2021

While buying cellphones, we often get confused while choosing between the different types of processors manufactured by different brands.

Snapdragon Symbol
We often wonder which will be the best buy at a given budget, what parameters we should compare to make a verdict. Let us see some of the crucial parameters based on selecting a processor that suits your need and does not burn a hole in your pocket. 

Clock Speed

This is one of the most fundamental aspects to look at in a processor. It refers to the frequency at which one core of the CPU is running and can be used as a benchmark to judge the processor's speed. It is indicated in GigaHertz (GHz).
Kirin Chipset
At this point, we can say; higher the clock speed faster is the processor. For example, Qualcomm Snapdragon 675 offers a clock speed of 2.0GHz, Kirin 970 by Huawei provides clock speeds up to 2.4GHz, Samsung Exynos 9610 runs at 2.3 GHz and so on.
Number of Cores
Next, we can draw comparisons by checking the number of cores provided in the CPU. CPUs with multiple cores can run multiple programs with greater ease. However, all cores are not the same. Often in multi-core processors, some cores are provided for carrying out a high-performance task, and a few are energy-efficient cores for running ordinary programs. It is to be noted that most of the applications cannot make use of multiple cores properly. Hence while choosing a processor, one  shall
Mediatek
look for the performance of single-core as well. For example, the latest Qualcomm Snapdragon 675, an octa-core processor is equipped with two cortex-A76 processors (Kryo 460 gold), which is the performance core and is clocked at 2.0 GHz. The other six processors are cortex -A55 (Kryo 460 Silver), which are meant for day-to-day tasks and consume lower power than the A76 cores, resulting in increased battery life. Similarly, Huawei Kirin 970 has four Cortex -A73 processors clocked at 2.4GHz and four cortex A-53 processors clocked at 1.8 GHz. MediaTek Helio P70 comes with four Cortex-A73 cores clocked at 2.1Ghz and power-efficient Cortex-A53 cores at 2.0Ghz.
*Cortex-A76 is the successor of Cortex-A75 and Cortex-A73 and has better performance than the latter one.
GPU (Graphics Processing Unit)
It handles the visual rendering elements of a phone display and decides the gaming performance of a processor. Essential aspects of GPU are its clock speed, maximum display resolution supported by GPU, and the fabrication technology, i.e., the thickness of the chip on which it is fabricated (mentioned in nm). 
GPU image
The most common GPU's used in smartphones is Adreno from Qualcomm, ARM Mali, and Power VR. Let's take an example of Adreno 612 and Mali-G72 MP3 GPU. Both have a clock speed of 850MHz. However, the Adreno 612 is fabricated on 14nm technology compared to the 16nm technology of Mali-G72 MP3. Hence, Adreno 612 has a slight edge in performance over the latter one.


Modem
This determines the maximum download and upload speeds supported by the processor and is usually mentioned in Mbps. Moreover, it decides the Wi-fi and Bluetooth connectivity supports. For example, Qualcomm snapdragon 675 houses the X12 LTE modem, which has a maximum download speed of 600Mbps (Cat 12) and maximum upload speed of 150Mbps (Cat 13). For Wi-Fi, it supports 802.11ac Wave 2 Wi-Fi standard with a peak speed of 867Mbps. For Bluetooth, it can support Bluetooth 5.0 technology. We will take a look at another standard chipset, MediaTek Helio P70. It has a peak download speed of 300Mbps (Cat 7) and an upload speed of 150Mbps (Cat 13). It supports Bluetooth 4.2.
Manufacturing Process
In general, fabrication on a thinner chip provides faster performance to the CPU. Hence a processor fabricated on an 11nm chip will have the edge over a chip manufactured on a 12nm chip.
Above are the significant parameters based on which you can decide which CPU to go for while buying smartphones. There are some other parameters like RAM speed and camera support, which in most cases can be taken as the higher, the better. And last but not least, the price matters a lot. Sometimes with a slight compromise in performance, you can get a significant price difference. So, consider all these factors while buying a smartphone to get a device that can fulfill your requirements.
Smartphone illustration

image source: google.com

Thursday, July 1, 2021

KineMaster Without Watermark for Android(.apk file) | Best Free Video Editor

This article is about 'How to get KineMaster Without Watermark for Android Users'. At the end of this post, few KineMaster premium versions will be shared. So, let us get started.

KineMaster is one of the best video-editing apps that have so many features on its plate to offer. Videos can be created out of the photos as well. Not only creating the video, but it also has the facility to add or remove background music to the video.

It has a bunch of free stickers, lots of animations, cool graphics, free sounds of different natural events or animals. Users can record their audio add it live on any video with its user-friendly Android interface. Users and export or save their video in MP4 format with different resolutions like 480p, 720p, 1080p, 4K 2160p at 30fps.

KineMAster Premium

In summary, KineMaster is a top-notch powerful software and is used by professionals as well.

As of now, the app has been downloaded more than 10 Cr times from the play store. It has the tag of Editors Choice. The app was originally launched by KineMaster Corporation, on 26th December 2013. 

Its free version has some limitations. The video generated or edited using the free version will be having its watermark on the top corner of the resulted video. The free version also shows ads when opening the app and before saving the created or edited videos.

Not to worry! We got your back. In this article, we will be sharing multiple Free Premium Kinemaster versions with all premium featured unlocked that have no ads and no limitations. Edited projects can be exported at the highest resolution without any watermark.

Hit the blue links, download the latest one and create some cool videos for your personal use, blog, or YouTube.

The latest version that is available in the Google Store is 5.0.8.21442.GP. If you face any difficulty to edit and export the edited projects in the latest version please pick the v4.813.12454 version.


Note: All these .apk files are scanned and do not contain any malware. As we are sharing these files from the google drive server it might warn the users that these files may harm users' computers. Please ignore those errors and download anyway.
Ignore Below Errors: 
Google Drive has detected issues with your download
This file is too large for Google to scan for viruses. Would you still like to download this file?
This file is executable and may harm your computer.

Thursday, June 17, 2021

Windows 7/8/9/10 | Save Full Webpage/Long Screenshot in PDF/JPEG Format

Taking a screenshot has become a part of a daily requirement these days. 

If you are writing a mail to a customer-care, you may need to attach some reference documents to the mail, and the screenshot feature proves to be your savior.

If you are a content writer, then you surely need to take multiple screenshots on your computer every now and then.

Not only that, you may need to save some important notes/documents from any website, but the same is not available in PDF format, then this procedure will come in handy for sure.

                      Click Button

Though taking a long or expanded screenshot is much easier in the case of Android/iOS for PC or Windows, it is a little bit trickier.

Do not worry, we got you covered!

By the end of this article, you will learn how to save any webpage in PDF format.

So, let us show you step by step how to take the long/expanded screenshots on your PC or Desktop.

1. Go to https://goscreenshotting.com/ on any of your web browsers.

goscreenshotting.com

2. Add the extension to the browser.

add to chrome


3. Pin the extension onto your web browser

Pin the Extension

4. Now open any webpage and use any of these options to take a screenshot.

sceenshot sample

5. Once the screenshot is captured, it can be saved in PDF/PNJ/JPEG format as well.

save screenshot


Hope you liked this article. Stay tuned for more tips and tricks like this.

Must Read!

No Premium! Play YouTube in the Background in Android/iPhone 2021.


If you are stuck at any point please watch this tutorial.

Tuesday, May 25, 2021

Facebook, Twitter Ban in India?

Big and scary question for most of us. Will Facebook and Twitter really be banned? Is 25th May 2021 is the last date to access these two social media apps, Facebook and Twitter? Will WhatsApp and Instagram are also under threat?

SOCIAL MEDIA

So many questions with no clear-cut answer!

Before looking for the answers to these puzzling questions, we need to first know what brings these questions up in mind? 

What is making people think that Facebook and Twitter will be banned in India in the first place?

In short, the answer is the conflict between the Govt of India and the social media apps' Authority. 

GoI basically gave an ultimatum back in February that all social media Apps have to follow some particular rules and regulations. They have to abide by the protocols set by the government.

At this point, 25th May 2021 was the last day for those social media Apps to sign that agreement.

Remembering Sokovia accord? (Ignore this joke if you're not much into Marvel Cinematic Universe movies).

Anyway, Facebook(and its subsidiaries, WhatsApp and Instagram), Twitter had neither agreed nor denied the protocols set by the Govt. Only Koo(Made in India) which's said to be Twitter's alternative, had signed or agreed or instead decided to comply with their operations as the Govt suggested.

It's not the first time that any Govt had conflicted with social media, online/offline print media, or other kinds of non-govt organization. From time to time, It's reported that various countries had conflicted with social media. As a result of the dispute, online social news channels were eventually highly controlled or shut down permanently.

In a series of press releases and through social media outlets, IT minister Ravi Shankar Prasad had said, “All social media is welcome, but — no disrespect — there should not be double standards........We will be giving a window of three months of significant social media........ And, the rest will come into effect from the day that these rules are notified...This provision is designed to respect the dignity of the users in India,”. 

So, what's the summary of this? Will those social media Giants deny to comply with their content with the protocols and regulations set by the Gol and leave India?

That's the most unlikely situation as the tech giants like Facebook and its offshoot, Insta, and WhatsApp has a massive and crucial customer base in India. And if that's the case, will there be an extension to the ultimatum, and the tech giants will eventually agree on some negotiated terms between the two.

Stay Tuned for more updates.

Tuesday, May 11, 2021

How to Remove All Images from Word Document/File At Once | 2021

Office Word Symbol
Microsoft Office Word is a very common tool that most professionals deal with it on regular basis. The bloggers or the content writers use Word on daily basis for writing, drafting, or correcting their contents. As the Word App is equipped with so many in-built features it is so popular from the beginning.

Though the application goes with the name Word we can easily insert images and graphics and work with them. Handling images of different formats like JPEG, PNG, GIF, is super easy in Word. Not only from the local computers or local network even pictures from online can easily be inserted.

In this article, we will show how to insert single or multiple images or remove them one by one or all at once. All the options or settings that will be mentioned here are from Word (2016). We are pretty sure these settings or the options would be almost the same across all versions of Office Word.

How to insert Image:

Click ‘INSERT’ on the top bar >> Pictures/Online Pictures >> <insert single or multiple pictures>

INSERT picture

How to remove a single image:

  1. Click anywhere on the photo that you want to delete.
  2. One box will appear around the selected photo.
  3. Hit the Delete/Backspace button.
  4. The selected photo will be deleted.

Sample Photo

How to remove all images at once:

We will use one of the in-built features of office Word. We will use the well-known ’Find & Replace’ option to perform this task.

  1. Click on the ‘HOME’ tab then find this option called, ‘Replace’. Replace Button
  2. Click on ‘Replace’and the below window will be popped up.
  3. In the ‘Find what’ section type ‘^g’.
  4. In the ‘Replace with’ section keep it blank.
  5. Click on ‘Replace All’

Refer to the picture below:


Replace Window

How this Works?

As we already understood it is working on the principle of ‘Find and Replace’. ‘^g’ is a notation to indicate all the diagrams, graphics, charts, etc. In the ‘Replace with’ section we are keeping that ‘blank’. So when we are hitting on the ‘Replace All’ button all the graphics, charts or diagrams are getting replaced with a ‘black’ that eventually removes the figures.

Drawback:

There is a slight drawback to this process. In this method, all the figures will be removed at once. You cannot selectively remove some of the photos. So if you need to remove all the photos or most of the photos then follow this tutorial. Once, all photos are removed you can insert some of the photos in place of them.

Another Use of his feature:

Let us say you are writing a script and used some small graphics or images to separate paragraphs/chapters from each other. Now after writing 100s of pages if you want to replace that small graphics or images with a new one then follow these steps.

  1. Insert the new image on top of the word document.
  2. Select the new picture and copy it (Ctrl+C or Right Click and Copy)
  3. Open the ‘Replace’ window as before
  4. Now as before give a ‘g’ in the ‘Find what’ section
  5. Put a ‘^c’ in the ‘Replace with’ section instead of blank. Here, ‘^c‘ is the clipboard that holds the new image.
  6. Hit the ‘Replace All’ button and Voilà!
  7. Old images are replaced by the new one.

Replace Window 2

Hope you liked this Tutorial guide step by step. To know more about the internet-related tips and tricks bookmark our page and keep visiting it. 

Also read: 

Looking for DeepNude? First Read Here Before Downloading | 2021

Saturday, May 8, 2021

(Part - 1) | August 2021 | Grammarly Premium Access | 100 % Working | 2021

Is Grammarly Free? Or the question should be framed as if there are any Free Grammarly versions available on the internet. Or is there any hack to make Grammarly free for your daily usage?

What is Grammarly?


Grammarly is a well-known Web Browser Extension that helps its users like students, content writers, or professionals in their writing. It is not just a regular spell checker. Grammarly’s advanced versions can correct poorly constructed sentences. It further helps with syntax, accurate phrasal verbs, and numerous writing styles, including a plagiarism checker. Grammarly acts as a proofreader. It is pretty advanced than regular old-fashioned word processors as it helps with the contextual phrasing of any sentence.

How proficient is this?


Grammarly is very much helpful for non-native English users mostly. Though it is suitable for non-technical content writing, it lacks few aspects to understand the technical terms. Grammarly does not interpret the URL links. For instance, if we write Oneplus. In, Grammarly suggests writing the same as Oneplus<dot><space>In as if “OnePlus. In”. It suggests ‘dark mode’ as ‘dark way,’ ‘WhatsApp Status’ as ‘WhatsApp Info,’ ‘phone data’ as ‘phone information,’ and so on.

Is it Free?

                     Free Grammarly Using Cookies Editor Method

Suppose you want to go by website plans, you have to pay for Premium and Business use cases. Grammarly's free version is nothing but a simple spell checker or pointing out silly mistakes like coma, semi-colon, etc.
Grammerly versionOfficially, there are three versions available of it: Free, Premium, and the Business.

Click Button

Let us take a look at what Grammarly says about its pricing and payment. This snippet from Grammarly's official website sums up that.

Pricing Details


To see more about the complete features list, I would suggest you visit the official website itself. You can directly enter from here Grammarly Prices and Plans.

FREE! FREE! FREE!

Now, we have come to this exciting point to show how to use Grammarly's Advanced versions for FREE of cost. This is not clickbait or scam, or phishing. We will share few login credentials which you can use for your personal interest.

We frequently change these passwords, so keep visiting our website and get the latest login credentials for your Grammarly extension. If any login credentials fail to work, please do make a comment. We will get the credentials updated.

Updated: 3rd August 2021


Username Password
me@vdoconferencing.com w#tr8YUj!ksl
usborn@notemypads.com Hs%sayd45Ts
olsen@corpopick.com gjh9RT$ks8dj
reviewnetgatoreader@gmail.com 20132013
contact@avagauthier.com PtJHP99QciWV
get@antoniopearson.com Uq7#OMnrpwyS

Hope you liked these tricks. To know more about these kinds of tips and tricks, keep visiting our website regularly.

Sunday, December 13, 2020

How to Install and Run ‘Double WhatsApp’ in Android Phone | 2021

Nowadays, every single android phone is coming with Dual SIM hardware support. So, anyone can use both the SIMs whenever needed. Though we can use both the SIMs, not a long time ago when we were limited to run only a Single WhatsApp Account associated with the single Phone number in android.

But the popular OEMs like Samsung, Xiaomi, Vivo, Oppo, Huawei, OnePlus, and many others have brought the solution to this issue with their in-built feature. That means we can run two WhatsApp accounts associated with both the SIMs inserted inside the phone. As we implied earlier, remember that we do not have to install any third-party apps for running double WhatsApp Account in a single phone.

Using ‘dual apps,’ ‘parallel apps,’ or ‘dual mode’ feature, it is very easy to install and run not only double WhatsApp but other applications as well. Instagram or Facebook, or any other applications can be installed with this feature. In this article, we will focus on installing and running two WhatsApp accounts in a single, smart Android Phone. Following that method, any user can install other chatting or social accounts as needed.

First, we will discuss how to use the in-built feature of the phone to use ‘dual mode’ or ‘parallel mode’ of the phone. But unfortunately, if your phone does not support an in-built feature for installing double WhatsApp or any other Apps, do not worry.

We have got your back. We will also, discuss an alternate method (using Third-Party Apps) to install and run multiple accounts associated with both phone numbers in your smartphone.

In-Build/Default Settings

So, buckle up and let us find the settings in our smartphone where we can start from.

Phones/Brands

Settings

Samsung

Settings >> Advanced Feature>>Dual Messenger

Xiaomi(Redmi)

Settings >> Dual Apps

Oppo(Real Me)

Settings >> Clone Apps

Vivo

Settings >> App Clone

Asus

Settings >> Twin Apps

Huawei/Honor

Settings >> App Twin

OnePlus

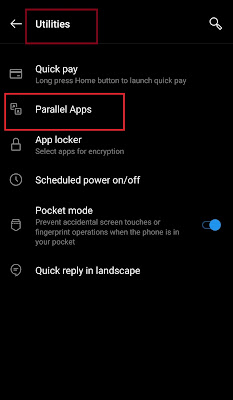
Settings >> Utilities >> Parallel Apps

Please note that these settings can differ slightly for different sets of the same brand. The settings’ paths may get modified a little in each update also. So, if you still do not get the desired settings, then be smart and search for ‘Dual’ or ‘Double’ or ‘Twin’ or ‘Clone.’ in your search button under the settings option.

Once you have found your Dual Apps, we can then proceed in using these below steps.

  1. Open Dual Apps Mode or Settings. We will show here an example of the OnePlus phone as a reference. Under Settings >> Utilities >> Parallel Apps.
    Utilities

  2. Now select the application (in this case WhatsApp) you want to duplicate or replicate in your phone
    WhatsApp

  3. Wait for the process to be completed. It may take a few seconds
  4. Once the process is completed, you can minimize or close the settings and come back to the home screen or your phone’s Apps Tray
  5. You can now find another WhatsApp Icon in your Home Screen or Apps Tray, as shown below
    Duplicated Content

  6. Now you can create a WhatsApp Account and run ‘double WhatsApp’ on your Smartphone. You do not have to install WhatsApp again

Though all phones now do not give their user this in-built feature, OEMs are incorporating this feature day by day. Shortly, maybe all of the Brands will provide the users with this default mode. As I mentioned earlier, Double WhatsApp, other social media apps, or chatting messengers can be installed and run with this mentioned method. Needless to say, users must not have two SIMs to install and run a double WhatsApp Account or any other chatting Apps.

Third-Party Apps

Now, unfortunately, if you had to come to this point because your phone is not having an in-built default feature, as we promised earlier, we will share methods for installing and running a double WhatsApp account on your Smartphone.

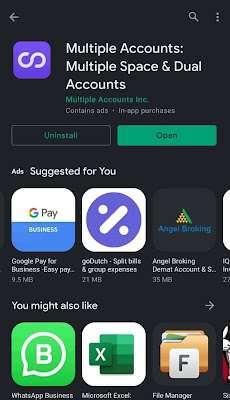
Go to Play Store on your smartphone and search for ‘Multiple Accounts’ or ‘Parallel Space’ or ‘Parallel App.’ Install any of the Applications from the top results and give the required access to the App.

Now follow the below steps.

  1. As a reference, let us see how we can install Double WhatsApp using Multiple Accounts, a third-party application from PlayStore.
    Multiple Accounts App

  2. Open the application, and an Apps tray would show up like this.
    App's Tray

  3. Now tap the big + sign(bottom-right corner of the above image) to see all the applications that were already installed on your phone.
    App's list

  4. Select the Apps(by tapping the + signs shown in the picture) you want to duplicate. Please note that at least one software has to be installed on your phone to make the duplicate. For this case, tap the + sign, situated beside WhatsApp Application.
  5. Once the app is selected, you will automatically be redirected to the app's tray like this.
    WhatsApp in Multiple Accounts

  6. Now you can add other applications if you want or proceed with the application of your interest.
  7. If you want to try WhatsApp, you can give your alternate phone number to install another simultaneous WhatsApp Account.
    Double WhatsApp Account
  8. Unlike the In-built feature where we can get another Duplicate Apps Icon is getting created in the System's Apps Menu or Home Screen, you have to open its own Apps for third-party applications tray to Run the Duplicate Account(s).
Hope you liked this detailed tutorial for installing and running Simultaneous Duplicate Accounts on your smartphone like WhatsApp, Messenger, Instagram, and other social or chatting Applications.

Follow us or bookmark us for the latest tech updates, internet tips & tricks, and many more.

Sunday, December 6, 2020

How to take screenshots on windows 10

How to take screenshots on windows 10

Want to take a screenshot of your PC or laptop? You have come to the right place. In this article, we will show you how to take screenshots on windows 10, Windows 7 or Windows 8.

If you are at school or going to college, you might have to take a few screenshots to finish up your school or college project. Not only that, if you are going to post an article to your tutorial blog post or running a YouTube Channel, you may need few screenshots to present your content in a better way.

Without beating much about the bush, let us come to the main discussion here. We will see the possible ways to get the screenshots of your PC or laptop so easily.

When we work with our computer or laptop there are some time when we need to capture the screen, or in simple terms, we need to take a screenshot of the PC screen.

Let us discuss how to take screenshots on windows 10

Here we will show very shortly how to capture a screenshot on Windows PC. If you face any issues to understand these below procedures, please read the full article till the end to know about more settings and options to capture the screenshots on windows PC.

PrtSc and Windows Button Position

1.       Find the PrtSc Key on your physical or onscreen keyboard. This PrtSc or sometimes marked as PrtScn Key's location on the PC might defer depending on the brand of PC you are using. Click PrtSc >> Open Paint App >> Press Ctrl + V >> Save/Save As

2.       If option 1 does not work, then Press Windows Button (W) + PrtSc together then follow same instructions as described in option 1

3.       Search Snipping Tool >> Open Snipping Tool >> Click on ‘New’ (Top Left of Snipping Tool) >> Select Screen to capture screenshot>> Save As (File option) or Copy (Edit Option)


Method 1: Windows Button (W) + PrtSc

PrtSc is the inbuilt key on most of the keyboards nowadays. This key resides on the keypad either as an individual key or as coupled with other keys in the first line (or near the Number keys). Wherever it be, we can use this key to take a screenshot of our PC. Now, it is to be noted that, though all these below methods are correct, some of them might be OS-specific only. So, if one of the methods does not work for your PC, try the other methods.

1.       Hold Windows Button (W) + PrtSc together. If this does nothing, then Press only PrtSc button.

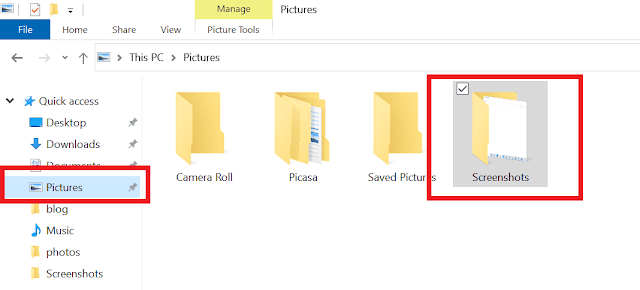
2.  The screen will be dimmed and the screenshots will be saved in “C:\Users\...\Pictures\Screenshots” folder. Or else a few options will be popped up on the top of the screen of the PC.

Popped up options

3.       Using those options, you can take the screenshot in rectangular format or in the freeform clip as you want or the full-screen screenshot of your PC.

4.       Select any option and drag over your PC screenshot (the part you want to take a screenshot of), and the screenshot will be automatically saved in “C:\Users\...\Pictures\Screenshots” folder.

Screenshots Folder location

5.       Now you can go to that Screenshots folder and edit the screenshot according to your need


 Method 2: PrtSc + MsPaint

This procedure involves two different inbuilt applications, i.e., PrtSc and MSPaint. The former one will capture the screenshot, and the latter one will help you edit and/or save the screenshots in any location on your PC with ‘Save’ or ‘Save As’ option.

1.       Press the PrtSc button on the Keyboard. This will copy the screenshot in the clipboard.

2.       Open MS Paint (or shortly Paint).

3.       And then press Ctrl+V to paste the screenshot in the MsPaint App.

4.       In MsPaint you can edit the Screenshot as required and then go to File >> ‘Save’ or ‘Save As’ option to save the screenshot in any folder in any format you want to.

Paint Save As  Option

Method 3: Snipping Tool

If nothing works; this will surely be working to any version of the OS available in your PC.

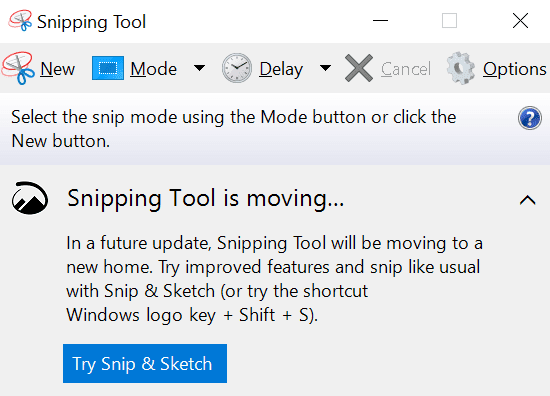
1.       Go to start or press Windows Button (W) and search for Snipping Tool. Once the result is seen in the search results, click on the Application.

Snippet Tool Search Result

2.      The application will be opened as below photo. This software comes with few options on the top bar. To take Screenshot we do not have to worry about all the options but the first one.

3.       Click on the first option ‘New (Scissors Symbol)’ and your screen will be dimmed. You can drag your mouse over your desktop screen to select the area you want to take the screenshot for.

Snipping Tool Menu

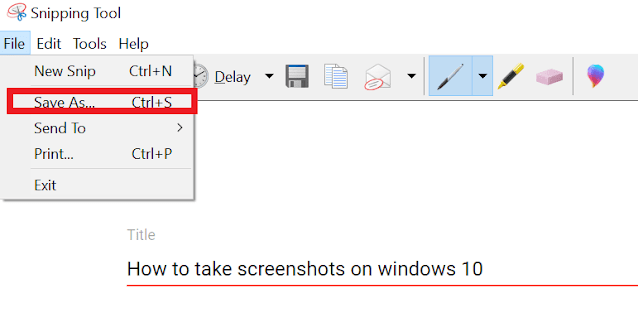
4.       Once the area is selected Snipping Tool will give few options. Out of that Click on File >> Save As (or Press Ctrl+S) to save the file in your preferred location with preferred Format.

Snipping Tool Save As Option

5.       Before saving the photo from Snipping Tool the screenshot can be edited too if needed.

6.       The screenshot can be copied from the ‘Edit’ option of Snipping tool to paste it in some other Tools or software like MS Office Word or Paint to further use.

Setting related issues to take screenshots on windows 10:

Generally, PrtSc key is by default enabled in each PC to take the screenshots of the PC. But unfortunately, If PrtSc or (W + PrtSc) does not work on your PC, you might want to take a look in your PC settings.

1.       Click Windows Button (W) or go to search (near Windows Symbol W) and directly type ‘Ease of Access keyboard Settings’.

Ease of Access search result

2.       Select the Option in the search Result ‘Ease of Access keyboard Settings’.

3.       Look for the option ‘Print Screen shortcut’ and toggle the Option if it is not done already.

Screenshot settings enable


Last Line

Taking a screenshot in Windows PC is really an easy-peasy job, but it is not known to everyone. So, after reading this article, you can now easily take screenshots, edit, and use them for your project or blog post, or tutorial.

If you face any difficulty capturing the screenshot in your Windows machine, please comment or reach out to us. We will be pleased to help you out.

Hope this article about taking a screenshot on Windows PC or Laptop is helpful to you. Have any computer or internet-related doubts or queries in mind? Want to read more about computer-related tips and tricks? Please do visit our blog regularly. We write quality content in detail with Screenshots to help them in a better way.

Featured Post

Join in Any 18+ WhatsApp Groups(10000+) in A Single Click | 2021

Welcome to this blog. Here, we love to share with you all the internet-related tips and tricks. If you plan to join different kinds of...