TechKnowTalkies: Misc. Talkies

Search This Blog

Showing posts with label Misc. Talkies. Show all posts

Tuesday, January 10, 2023

Explain quantum computing in simple terms

 In traditional computers, data is stored as bits, which have a value of either 0 or 1. In a quantum computer, data is stored as qubits, which can exist in multiple states simultaneously. This allows quantum computers to perform certain types of calculations much faster than traditional computers.

The most famous algorithm that is faster in quantum computer is Shor's algorithm for factorizing integers in polynomial time, which is a huge improvement over the best known classical algorithms that run in exponential time. This is why Quantum computers have the potential to revolutionize fields like cryptography and drug discovery. However, quantum computers are still in the early stages of development and it's uncertain when they will be available for general use.

Thursday, August 5, 2021

DeepNude 2021 : An app that creates nudes of women in seconds

By this time you all know that an application has been launched that can create nude photos of any woman within a few seconds. Though the official website has been closed down a copy of the software is still available on the internet. The application is based on Neural Network and written in python code. 
Blurred sample pic
Deepfake is a technique where AI combines and superimposes one image or video onto another image or video by using a machine-learning technique called Generative Adversarial Network(GEN). Here’s an example where Sylvester Stallone is starring in the movie Terminator 2 instead of Arnold Schwarzenegger.
While the above video causes no harm to anyone, a darker side of DeepFake emerged in the form of an app called DeepNude, which allows anyone to generate nude images of women with little or no effort. All they have to do is insert a photo of a woman wearing clothes into the app. The DeepNude app is available to download free for Windows. There’s a premium version that provides better resolution output images and is priced at 99$. Both, free as well as premium versions add the watermark ‘fake nude’ to the images to identify them.


This DeepNude app is created by someone who identifies himself as ‘Alberto’. He said he was inspired by the memories of old comic book adverts for “X-ray specs”, which promised they could be used to see through people's clothes. He also stated that he is aware of the potential harms that can be caused by this software, but still decided to go ahead with it. Alberto told Motherboard “I also said to myself: the technology is ready. So if someone has bad intentions, having DeepNude doesn’t change much. If I don’t do it, someone else will do it in a year.” He also added that if people started using the app for malicious purposes, they will quit it for sure.

image source: theverge.com

Sunday, July 11, 2021

How to Download Instagram DP in Full Size with Phone or Computer | 2021

Ever wanted to search for someone on Instagram but eventually got frustrated because the account may be private and DP shown in the search results are too small to understand who they really are? Or, at times, you receive a follow request, but you can not recognise the person who sent it because their account is private and the photo in the DP is too small. Or sometimes, you may want to save your own DP or your crush's picture onto your phone. 

Download Instagram DP

At this moment, some tricks to see the Instagram DP in full size may come to your rescue. Now, this article will show you how to download Instagram DP in Full Size.

Trick 1:

This is an evergreen feature of saving any picture from the internet. Except few all websites or applications have this feature available to save the photo by "right-click >> Save image as" option.
  1. Open Instagram.com on your computer web browser.
  2. Search for the name or ID in the Search Tab.
  3. Click on one of the suggestions.
  4. Right-click on the profile picture. Go to the 'Save image as' option and save it. 
If you do not have your computer handy and are using a smartphone, you need to do something tricky. 
  1. Open your phone browser(Chrome or Firefox) in Desktop Mode. (If you do not know how to do it, please follow this link)
  2. Now follow the first part of Trick 1
  3. If opening instagram.com on mobile redirecting you to the installed Instagram App(where you can not download any DP), open the browser in incognito/private mode. This will prevent the browser from being redirected to the installed App.

Trick 2:

  1. Open Instadp.com from your smartphone or computer browser.
  2. Search for the name (or ID if you know).
  3. From the suggestions, click on any ID.
  4. The profile will be opened with a full-size picture of the DP. (At this stage, a 4 seconds Ad may pop up. Do skip it after 4 seconds)
  5. You can download by clicking the 'download' option or by right click >> Save image as' option.
Except for these two methods, there are other websites where you can view DP in full size or download them. To name a few: izuum.com,  wizblogger.com, instadpdownloader.com, etc.

image source: google.com

Saturday, July 10, 2021

Why LED Cricket Stumps Cost 50 Lakh | Read Here How They Work

Every cricket lover can feel the thrill when bowlers uproot the stumps with their vicious Yorkers. The bails come off, and stumps and bails start glowing. The umpire raises his hand, the batsman is declared out, and he has to walk back to the pavilion. Sounds good?

However, there are certain moments, like run-outs, when it is crucial to know at what moment the bails have been dislodged. During close calls, the decision of batsman being out or not out depends on that. Earlier, the moment of dislodging of bails was decided by the judgment of umpires and that might have resulted in speculations over the decision. But not anymore.
stumps

This blog will give you a technical understanding of what is going on behind this wonderful technique.

Bail
Bronte EcKermann of Zing International came up with a set of stumps and bails which start glowing the moment bails are entirely dislodged from the stumps. This makes it easy for the umpires to take calls in run-out decisions. It is claimed that the sensors react within 1/1000th of a second after they have been dislodged,, thus eliminating chances of any error in judgment.

Light Sensor and LEDs
The circuit of bails contains one light sensor at each end and a LED circuit inside it. When they are placed over the stumps, the light sensor cannot get any light, and hence the LED circuit is incomplete.

The moment they are entirely dislodged, the sensors get light, LED circuit gets completed, and the bails start glowing.
A similar kind of circuit is provided in the stumps as well, but with the light sensor at only one end. Whenever the bails are taken off, the light falls on the sensor and stumps the light up.

While the Zing wickets look pretty elegant and help in better decision-making, they are pretty costly. Each system of wickets and bails used in international games costs about Rs. 25 lakhs. So no more taking home stumps after winning the match!


Image source: google.com


Friday, July 9, 2021

Generic comparisons between different mobile chipsets | 2021

While buying cellphones, we often get confused while choosing between the different types of processors manufactured by different brands.

Snapdragon Symbol
We often wonder which will be the best buy at a given budget, what parameters we should compare to make a verdict. Let us see some of the crucial parameters based on selecting a processor that suits your need and does not burn a hole in your pocket. 

Clock Speed

This is one of the most fundamental aspects to look at in a processor. It refers to the frequency at which one core of the CPU is running and can be used as a benchmark to judge the processor's speed. It is indicated in GigaHertz (GHz).
Kirin Chipset
At this point, we can say; higher the clock speed faster is the processor. For example, Qualcomm Snapdragon 675 offers a clock speed of 2.0GHz, Kirin 970 by Huawei provides clock speeds up to 2.4GHz, Samsung Exynos 9610 runs at 2.3 GHz and so on.
Number of Cores
Next, we can draw comparisons by checking the number of cores provided in the CPU. CPUs with multiple cores can run multiple programs with greater ease. However, all cores are not the same. Often in multi-core processors, some cores are provided for carrying out a high-performance task, and a few are energy-efficient cores for running ordinary programs. It is to be noted that most of the applications cannot make use of multiple cores properly. Hence while choosing a processor, one  shall
Mediatek
look for the performance of single-core as well. For example, the latest Qualcomm Snapdragon 675, an octa-core processor is equipped with two cortex-A76 processors (Kryo 460 gold), which is the performance core and is clocked at 2.0 GHz. The other six processors are cortex -A55 (Kryo 460 Silver), which are meant for day-to-day tasks and consume lower power than the A76 cores, resulting in increased battery life. Similarly, Huawei Kirin 970 has four Cortex -A73 processors clocked at 2.4GHz and four cortex A-53 processors clocked at 1.8 GHz. MediaTek Helio P70 comes with four Cortex-A73 cores clocked at 2.1Ghz and power-efficient Cortex-A53 cores at 2.0Ghz.
*Cortex-A76 is the successor of Cortex-A75 and Cortex-A73 and has better performance than the latter one.
GPU (Graphics Processing Unit)
It handles the visual rendering elements of a phone display and decides the gaming performance of a processor. Essential aspects of GPU are its clock speed, maximum display resolution supported by GPU, and the fabrication technology, i.e., the thickness of the chip on which it is fabricated (mentioned in nm). 
GPU image
The most common GPU's used in smartphones is Adreno from Qualcomm, ARM Mali, and Power VR. Let's take an example of Adreno 612 and Mali-G72 MP3 GPU. Both have a clock speed of 850MHz. However, the Adreno 612 is fabricated on 14nm technology compared to the 16nm technology of Mali-G72 MP3. Hence, Adreno 612 has a slight edge in performance over the latter one.


Modem
This determines the maximum download and upload speeds supported by the processor and is usually mentioned in Mbps. Moreover, it decides the Wi-fi and Bluetooth connectivity supports. For example, Qualcomm snapdragon 675 houses the X12 LTE modem, which has a maximum download speed of 600Mbps (Cat 12) and maximum upload speed of 150Mbps (Cat 13). For Wi-Fi, it supports 802.11ac Wave 2 Wi-Fi standard with a peak speed of 867Mbps. For Bluetooth, it can support Bluetooth 5.0 technology. We will take a look at another standard chipset, MediaTek Helio P70. It has a peak download speed of 300Mbps (Cat 7) and an upload speed of 150Mbps (Cat 13). It supports Bluetooth 4.2.
Manufacturing Process
In general, fabrication on a thinner chip provides faster performance to the CPU. Hence a processor fabricated on an 11nm chip will have the edge over a chip manufactured on a 12nm chip.
Above are the significant parameters based on which you can decide which CPU to go for while buying smartphones. There are some other parameters like RAM speed and camera support, which in most cases can be taken as the higher, the better. And last but not least, the price matters a lot. Sometimes with a slight compromise in performance, you can get a significant price difference. So, consider all these factors while buying a smartphone to get a device that can fulfill your requirements.
Smartphone illustration

image source: google.com

Thursday, May 13, 2021

Error 1: Earnings at risk - You need to fix some ads.txt file issues to avoid severe impact to your revenue

What is Blogging or Blogger? 

The Wiki says,
Blogger is an American online content management system (CMS) which enables multi-user blogs with time-stamped entries. Pyra Labs developed it before being acquired by Google in 2003. Google hosts the blogs, which can be accessed through a subdomain of blogspot.com. Blogs can also be accessed from a user-owned custom domain (such as www.example.com) by using DNS facilities to direct a domain to Google's servers. A user can have up to 100 blogs or websites per account.

Google Blogger also enabled users to publish blogs and websites to their own web hosting server via FTP until May 1, 2010. All such blogs and websites had to be redirected to a blogspot.com subdomain or point their own domain to Google's servers via DNS. Google Blogger has a wide international user base and is available in more than 60 languages, despite its decline in popularity in the United States.

What is Adsense? 

The Wiki further says,

Google AdSense is a program run by Google through which website publishers in the Google Network of content sites serve text, images, video, or interactive media advertisements that are targeted to the site content and audience. These advertisements are administered, sorted, and maintained by Google. They can generate revenue on either a per-click or per-impression basis. Google beta-tested a cost-per-action service, but discontinued it in October 2008 in favor of a DoubleClick offering (also owned by Google). In Q1 2014, Google earned US$3.4 billion ($13.6 billion annualized), or 22% of total revenue, through Google AdSense. AdSense is a participant in the AdChoices program, so AdSense ads typically include the triangle-shaped AdChoices icon. This program also operates on HTTP cookies. In 2021, over 38.3 million websites use AdSense.

Common Error After Adsense Getting Approved

"Earnings at risk - You need to fix some ads.txt file issues to avoid severe impact to your revenue."

Why fix this?

Adsense support explained in their blog,
Authorized Digital Sellers, or ads.txt is an IAB Tech Lab initiative that helps ensure that your digital ad inventory is only sold through sellers (such as AdSense) who you've identified as authorized. Creating your own ads.txt file gives you more control over who's allowed to sell ads on your site and helps prevent counterfeit inventory from being presented to advertisers.

We strongly recommend that you use an ads.txt file. It can help buyers identify counterfeit inventory and help you receive more advertiser spend that might have otherwise gone toward that counterfeit inventory.

How to Fix ads.txt issues in AdSense


When Blogger shows this Error in the Adsense Approved page, it also suggests the steps to fix this error.

Let us see how to fix this error.

Step 1: Click on the option 'Fix now.' Then the below window will open with the option 'DOWNLOAD'. Click on the 'DOWNLOAD' button, and one text file will be downloaded named, ads.txt
Download Ads.txt

Step 2: If you open the ads.txt file, you can see a few details as shown below. This will have the information of your 16-digit publisher ID as pub-1234567890123456 and some other 16-digit Google tracking ID as abcabcabcabcabca. The pub ID and the tracking ID that is shown here are for demo only.

Ads text file example
Step 3: Now go to Blogger.com and log into your blog.
Step 4: In the left pane, find the option called 'Settings.'
Settings
Step 5: Once you click on the 'Settings,'  some more options will appear. Scroll down till you find the option called 'Monetization.' Enable that toggle button and then click on the 'Custom ads.txt.'

Step 6: Now copy the content of the ads.txt file that you already downloaded before. Now paste that copied text into this place and 'SAVE' that information.
SAVE ads.txt file
You are done now. 

Take a chill pill and relax. As Adsense itself indicates that it might take a few days to reflect this setting in your blog. That means even though the issue is fixed from our side, we can still see this error message for another couple of days.

Hope you liked this tutorial guide step by step. To learn more about the internet-related tips and tricks, bookmark our page and keep visiting it. 

Also read:

Sunday, December 6, 2020

How to take screenshots on windows 10

How to take screenshots on windows 10

Want to take a screenshot of your PC or laptop? You have come to the right place. In this article, we will show you how to take screenshots on windows 10, Windows 7 or Windows 8.

If you are at school or going to college, you might have to take a few screenshots to finish up your school or college project. Not only that, if you are going to post an article to your tutorial blog post or running a YouTube Channel, you may need few screenshots to present your content in a better way.

Without beating much about the bush, let us come to the main discussion here. We will see the possible ways to get the screenshots of your PC or laptop so easily.

When we work with our computer or laptop there are some time when we need to capture the screen, or in simple terms, we need to take a screenshot of the PC screen.

Let us discuss how to take screenshots on windows 10

Here we will show very shortly how to capture a screenshot on Windows PC. If you face any issues to understand these below procedures, please read the full article till the end to know about more settings and options to capture the screenshots on windows PC.

PrtSc and Windows Button Position

1.       Find the PrtSc Key on your physical or onscreen keyboard. This PrtSc or sometimes marked as PrtScn Key's location on the PC might defer depending on the brand of PC you are using. Click PrtSc >> Open Paint App >> Press Ctrl + V >> Save/Save As

2.       If option 1 does not work, then Press Windows Button (W) + PrtSc together then follow same instructions as described in option 1

3.       Search Snipping Tool >> Open Snipping Tool >> Click on ‘New’ (Top Left of Snipping Tool) >> Select Screen to capture screenshot>> Save As (File option) or Copy (Edit Option)


Method 1: Windows Button (W) + PrtSc

PrtSc is the inbuilt key on most of the keyboards nowadays. This key resides on the keypad either as an individual key or as coupled with other keys in the first line (or near the Number keys). Wherever it be, we can use this key to take a screenshot of our PC. Now, it is to be noted that, though all these below methods are correct, some of them might be OS-specific only. So, if one of the methods does not work for your PC, try the other methods.

1.       Hold Windows Button (W) + PrtSc together. If this does nothing, then Press only PrtSc button.

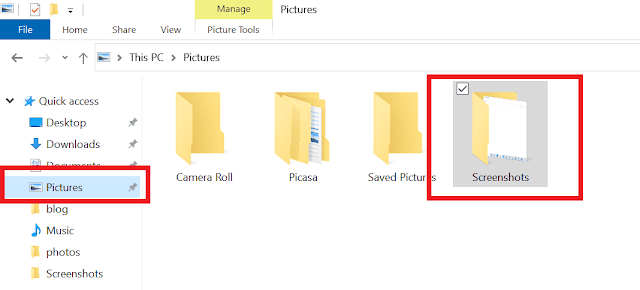
2.  The screen will be dimmed and the screenshots will be saved in “C:\Users\...\Pictures\Screenshots” folder. Or else a few options will be popped up on the top of the screen of the PC.

Popped up options

3.       Using those options, you can take the screenshot in rectangular format or in the freeform clip as you want or the full-screen screenshot of your PC.

4.       Select any option and drag over your PC screenshot (the part you want to take a screenshot of), and the screenshot will be automatically saved in “C:\Users\...\Pictures\Screenshots” folder.

Screenshots Folder location

5.       Now you can go to that Screenshots folder and edit the screenshot according to your need


 Method 2: PrtSc + MsPaint

This procedure involves two different inbuilt applications, i.e., PrtSc and MSPaint. The former one will capture the screenshot, and the latter one will help you edit and/or save the screenshots in any location on your PC with ‘Save’ or ‘Save As’ option.

1.       Press the PrtSc button on the Keyboard. This will copy the screenshot in the clipboard.

2.       Open MS Paint (or shortly Paint).

3.       And then press Ctrl+V to paste the screenshot in the MsPaint App.

4.       In MsPaint you can edit the Screenshot as required and then go to File >> ‘Save’ or ‘Save As’ option to save the screenshot in any folder in any format you want to.

Paint Save As  Option

Method 3: Snipping Tool

If nothing works; this will surely be working to any version of the OS available in your PC.

1.       Go to start or press Windows Button (W) and search for Snipping Tool. Once the result is seen in the search results, click on the Application.

Snippet Tool Search Result

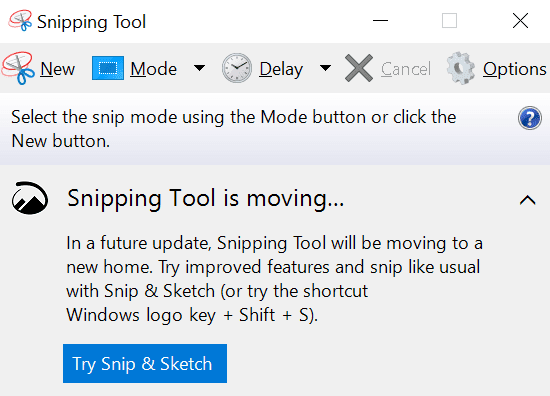
2.      The application will be opened as below photo. This software comes with few options on the top bar. To take Screenshot we do not have to worry about all the options but the first one.

3.       Click on the first option ‘New (Scissors Symbol)’ and your screen will be dimmed. You can drag your mouse over your desktop screen to select the area you want to take the screenshot for.

Snipping Tool Menu

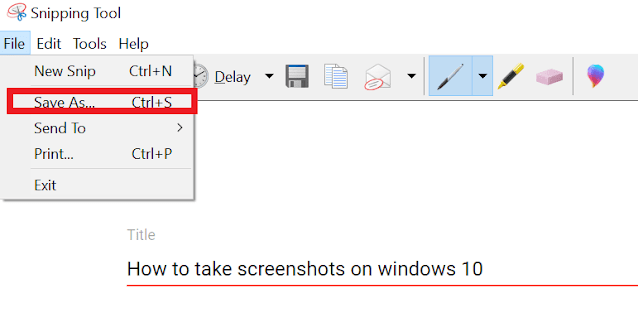
4.       Once the area is selected Snipping Tool will give few options. Out of that Click on File >> Save As (or Press Ctrl+S) to save the file in your preferred location with preferred Format.

Snipping Tool Save As Option

5.       Before saving the photo from Snipping Tool the screenshot can be edited too if needed.

6.       The screenshot can be copied from the ‘Edit’ option of Snipping tool to paste it in some other Tools or software like MS Office Word or Paint to further use.

Setting related issues to take screenshots on windows 10:

Generally, PrtSc key is by default enabled in each PC to take the screenshots of the PC. But unfortunately, If PrtSc or (W + PrtSc) does not work on your PC, you might want to take a look in your PC settings.

1.       Click Windows Button (W) or go to search (near Windows Symbol W) and directly type ‘Ease of Access keyboard Settings’.

Ease of Access search result

2.       Select the Option in the search Result ‘Ease of Access keyboard Settings’.

3.       Look for the option ‘Print Screen shortcut’ and toggle the Option if it is not done already.

Screenshot settings enable


Last Line

Taking a screenshot in Windows PC is really an easy-peasy job, but it is not known to everyone. So, after reading this article, you can now easily take screenshots, edit, and use them for your project or blog post, or tutorial.

If you face any difficulty capturing the screenshot in your Windows machine, please comment or reach out to us. We will be pleased to help you out.

Hope this article about taking a screenshot on Windows PC or Laptop is helpful to you. Have any computer or internet-related doubts or queries in mind? Want to read more about computer-related tips and tricks? Please do visit our blog regularly. We write quality content in detail with Screenshots to help them in a better way.

Monday, November 16, 2020

Dial *#*#4636#*#* and Check What Will happen

Everyone is aware of the settings that are provided in the menu of the OS. However, another group of settings is available for android users, which provides several details about your mobile network and allows you certain manipulations like switching your preferred network type and setting an SMSC number.

To access these settings and details, dial *#*#4636#*#* on your phone. A menu similar to the one shown below will be popped up.

Step 1


Click on "Phone information1" or any equivalent option available on your device.

A screen showing details of your network on SIM slot 1 will be displayed. Here you can see the IMEI number, current carrier, strength of the signal, voice network type (GSM/LTE), data network type, etc.

Step 2


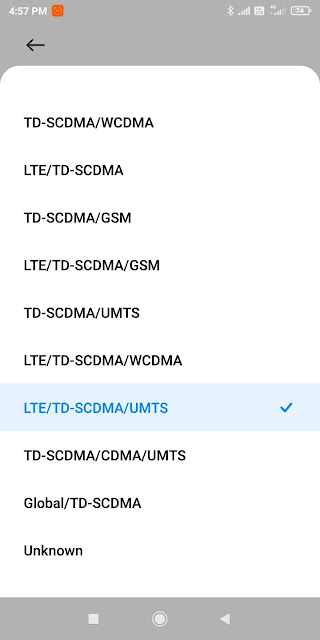
The "Set preferred network type" drop-down menu offers the option to change your network to desired types like LTE, GSM, UMTS, etc., as shown below.

Step 3

You can also run a ping test to check network connectivity.

Overall it provides quite detailed information that cannot be accessed from the default settings option available in the menu of OS.

Saturday, October 10, 2020

Intelligent Bionic Eye is Ready for Human Trial | Melbourne, Australia

Bionic Eye illustration

Science and technology never fail to amaze us with their new inventions and discovery. 

After researching for more than a decade, a group of researchers and scientists are reportedly happy to announce that they made an artificial bionic eye that can help blind people see the world.

Bionic Eye illustration 3Bionic organs for the human body are not new things. Bionic limbs like hands or legs are readily available in the market in commercial form. But the bionic eye that can eliminate blindness for some groups of blind people is really the coolest and the smartest.

Melbourne, Australia-based Monash University has built an intelligent system that will bypass the damaged optic nerves in the retina(that causes permanent blindness) and transmit the signal directly to the 'view' center of the brain.

This smart bionic eye, aka 'Gennari's bionic vision system,' has two main components, Headgear and Chip.

Headgear will be in front of the eye with the help of some kind of spectacles, and a tiny 9mm Bionic Chip will be implanted in the brain. Though it sounds scary, the good thing is this bionic eye has already been tested on ships, and scientists have found some positive results with negligible side effects. The next trial has been planned on humans now in Melbourne itself.

Bionic Eye illustration 2

"Our design creates a visual pattern from combinations of up to 172 spots of light (phosphenes) which provides information for the individual to navigate indoor and outdoor environments, and recognize the presence of people and objects around them.....If successful, the MVG [Monash Vision Group] team will look to create a new commercial enterprise focused on providing a vision to people with untreatable blindness and movement to the arms of people paralyzed by quadriplegia, transforming their health care", Arthur Lowery, professor at Monash University's Department of Electrical and Computer Systems Engineering stated. 

Now, hopefully, if this smart bionic eye works as it reported, it would be a great help and gift to humanity. Though its cost might be prohibitive initially, the same will be drastically reduced over time as technology progresses. Govt can also subsidize and mass produce it to minimize the cost further.


Friday, September 25, 2020

Files By Google | How To Bypass App's Lock in Android Phones | 2021

Want to check out the gallery/document of somebody else's phone? But nowadays, it is very likely that the phone gallery and the file manager application is locked by some third-party application(not the phone lock we are talking about). Do not worry. We have a trick for you, and it is very easy.

Install another file manager kind of genuine application, let us say, 'Files.' This 'Files' named application is owned by Google and is authentic to use. Install this application by giving access to your phone memory or storage and gallery.

Once the application is installed, open it. Now you can see all the photos, videos, and many other things that were not visible using other applications that were locked.

Files by Google Apps Link: https://play.google.com/store/apps/details?id=com.google.android.apps.nbu.files 

Files By Google

More Tips and Tricks for this application:

  1. Photos and Videos from somebody else's WhatsApp Status can be downloaded easily. To know more about this, please read this article.
  2. You can efficiently manage your phone's memory by removing duplicate or repeated photos/videos from your storage. This app will scan and find out the duplicate contents of your phone.
  3. You can search your phone by files/folder/document/image name very much faster than the other applications.
  4. Contents like document, images, or videos can be shared offline or taken the backup in the cloud or an online server.

More interesting articles: 

Thursday, November 28, 2019

Facebook & Instagram are Down Again | 2021

It seems Facebook.com is down temporarily for some unknown reason. The below description is being displayed while trying to log in.

Facebook Will Be Back Soon


Facebook is down for required maintenance right now, but you should be able to get back on within a few minutes. In the meantime, read more about why you see this message. Thanks for your patience as we improve the site.

Facebook is download

Some people confirmed that Instagram is also down. Check it out here.


Saturday, November 9, 2019

Join in Any 18+ WhatsApp Groups(10000+) in A Single Click | 2021

WhatsApp group Illustration

Welcome to this blog. Here, we love to share with you all the internet-related tips and tricks. If you plan to join different kinds of WhatsApp groups with a single click, you have come to the right place. You just need to install an Android application, install it, search the group you want to join. Voila!

This application lists so many WhatsApp groups, from business to tech to the community to school and college to veg, non-veg jokes, and so many. Explore for yourselves around 10000+ WhatsApp groups by installing this 2.94 MB application.

Enough talking! The download link of the application WhatsApp Group Link is being provided below.
App Download Version
1.3
Last Updated
October 28, 2017
Apk Size
2.94 MB
App By
Elite Technology
Category
Free Social App
Content Rating
Mature 18+
Support Android Version
Android 4.0 and above

Screenshot of the Application: 
step 1


download button

Click the button and get 10000+ Group Link to Join Via WhatsApp.


Featured Post

Join in Any 18+ WhatsApp Groups(10000+) in A Single Click | 2021

Welcome to this blog. Here, we love to share with you all the internet-related tips and tricks. If you plan to join different kinds of...