TechKnowTalkies

Search This Blog

Friday, May 14, 2021

Error :2 : We encourage you to publish your seller information in the Google sellers.json file. Visit the Account settings page to review your current visibility status

What is Blogging or Blogger? 

The Wiki says,
Blogger is an American online content management system (CMS) which enables multi-user blogs with time-stamped entries. Pyra Labs developed it before being acquired by Google in 2003. Google hosts the blogs, which can be accessed through a subdomain of blogspot.com. Blogs can also be accessed from a user-owned custom domain (such as www.example.com) by using DNS facilities to direct a domain to Google's servers. A user can have up to 100 blogs or websites per account.

Google Blogger also enabled users to publish blogs and websites to their own web hosting server via FTP until May 1, 2010. All such blogs and websites had to be redirected to a blogspot.com subdomain or point their own domain to Google's servers via DNS. Google Blogger has a wide international user base and is available in more than 60 languages, despite its decline in popularity in the United States.

What is Adsense? 

The Wiki further says,

Google AdSense is a program run by Google through which website publishers in the Google Network of content sites serve text, images, video, or interactive media advertisements that are targeted to the site content and audience. These advertisements are administered, sorted, and maintained by Google. They can generate revenue on either a per-click or per-impression basis. Google beta-tested a cost-per-action service, but discontinued it in October 2008 in favor of a DoubleClick offering (also owned by Google). In Q1 2014, Google earned US$3.4 billion ($13.6 billion annualized), or 22% of total revenue, through Google AdSense. AdSense is a participant in the AdChoices program, so AdSense ads typically include the triangle-shaped AdChoices icon. This program also operates on HTTP cookies. In 2021, over 38.3 million websites use AdSense.

Common Error After Adsense Getting Approved

Have you got stuck in this error right after your Adsense got approved from Google?

"We encourage you to publish your seller information in the Google sellers.json file. Visit the Account settings page to review your current visibility status."

Why Fix This?

Blogspot itself answered this question.
Sellers.json is an IAB Tech Lab standard that increases transparency in the ads ecosystem and helps to combat fraud. Sellers.json works through a publicly available file of seller information. Publishers can elect to share their individual name or business name (depending on their AdSense account type) in the file. This gives advertisers a reliable way to discover and verify the identity of publishers.
We encourage you to make your information transparent and allow your individual or business name to be listed. This will help advertisers to verify your inventory. If your information isn't made transparent, advertisers won't be able to see your name, which might impact your revenue.

How to resolve is this sellers.json issue? 

This is basically designed to deal with Inventory management that provides our seller information with sellers.json

Step-1: Click on the option 'Action.'
Step-2: Once it is clicked, a page filled with Adsence Account details will come. Scroll down till you find Seller information visibility. Under that tag, you will be having one item called Select your visibility status.

Step-3: By default, this status value is selected as 'Confidential.' You need to select 'Transparent.'
Step-4: Under the same item, enter your Business domain name or simply your website name. Wait for a few seconds, and your settings will be saved.

You are done.

You can refresh the page, and you will see the error is gone immediately.

Also read: 


Thursday, May 13, 2021

Error 1: Earnings at risk - You need to fix some ads.txt file issues to avoid severe impact to your revenue

What is Blogging or Blogger? 

The Wiki says,
Blogger is an American online content management system (CMS) which enables multi-user blogs with time-stamped entries. Pyra Labs developed it before being acquired by Google in 2003. Google hosts the blogs, which can be accessed through a subdomain of blogspot.com. Blogs can also be accessed from a user-owned custom domain (such as www.example.com) by using DNS facilities to direct a domain to Google's servers. A user can have up to 100 blogs or websites per account.

Google Blogger also enabled users to publish blogs and websites to their own web hosting server via FTP until May 1, 2010. All such blogs and websites had to be redirected to a blogspot.com subdomain or point their own domain to Google's servers via DNS. Google Blogger has a wide international user base and is available in more than 60 languages, despite its decline in popularity in the United States.

What is Adsense? 

The Wiki further says,

Google AdSense is a program run by Google through which website publishers in the Google Network of content sites serve text, images, video, or interactive media advertisements that are targeted to the site content and audience. These advertisements are administered, sorted, and maintained by Google. They can generate revenue on either a per-click or per-impression basis. Google beta-tested a cost-per-action service, but discontinued it in October 2008 in favor of a DoubleClick offering (also owned by Google). In Q1 2014, Google earned US$3.4 billion ($13.6 billion annualized), or 22% of total revenue, through Google AdSense. AdSense is a participant in the AdChoices program, so AdSense ads typically include the triangle-shaped AdChoices icon. This program also operates on HTTP cookies. In 2021, over 38.3 million websites use AdSense.

Common Error After Adsense Getting Approved

"Earnings at risk - You need to fix some ads.txt file issues to avoid severe impact to your revenue."

Why fix this?

Adsense support explained in their blog,
Authorized Digital Sellers, or ads.txt is an IAB Tech Lab initiative that helps ensure that your digital ad inventory is only sold through sellers (such as AdSense) who you've identified as authorized. Creating your own ads.txt file gives you more control over who's allowed to sell ads on your site and helps prevent counterfeit inventory from being presented to advertisers.

We strongly recommend that you use an ads.txt file. It can help buyers identify counterfeit inventory and help you receive more advertiser spend that might have otherwise gone toward that counterfeit inventory.

How to Fix ads.txt issues in AdSense


When Blogger shows this Error in the Adsense Approved page, it also suggests the steps to fix this error.

Let us see how to fix this error.

Step 1: Click on the option 'Fix now.' Then the below window will open with the option 'DOWNLOAD'. Click on the 'DOWNLOAD' button, and one text file will be downloaded named, ads.txt
Download Ads.txt

Step 2: If you open the ads.txt file, you can see a few details as shown below. This will have the information of your 16-digit publisher ID as pub-1234567890123456 and some other 16-digit Google tracking ID as abcabcabcabcabca. The pub ID and the tracking ID that is shown here are for demo only.

Ads text file example
Step 3: Now go to Blogger.com and log into your blog.
Step 4: In the left pane, find the option called 'Settings.'
Settings
Step 5: Once you click on the 'Settings,'  some more options will appear. Scroll down till you find the option called 'Monetization.' Enable that toggle button and then click on the 'Custom ads.txt.'

Step 6: Now copy the content of the ads.txt file that you already downloaded before. Now paste that copied text into this place and 'SAVE' that information.
SAVE ads.txt file
You are done now. 

Take a chill pill and relax. As Adsense itself indicates that it might take a few days to reflect this setting in your blog. That means even though the issue is fixed from our side, we can still see this error message for another couple of days.

Hope you liked this tutorial guide step by step. To learn more about the internet-related tips and tricks, bookmark our page and keep visiting it. 

Also read:

Wednesday, May 12, 2021

How to Reduce Data Usage on Windows 10

How to Turn off Background Data for Windows:

How many of us have noticed that windows is consuming data at a rather unusual speed? It's like you are using your mobile data via hotspot for half an hour and BANG! It's finished. It's frustrating that data is consumed even when you are literally doing nothing, thanks to a few processes that run in the background even when windows is idle. Today we are going to see what these processes are and how to get rid of them and save our precious data.

1. Turn off Automatic Updates:

Windows OS is known for rolling out updates every now and then. And with the "Automatic Updates" feature ON by default, it keeps downloading updates whenever your system is connected to the internet. So one way of saving data from being consumed is to turn off these automatic updates. Here, I want to highlight one thing that by turning off automatic updates you are not going to miss out the latest features released for windows. You just have to do them manually whenever you want to. Now let's see how to turn off automatic updates on windows 10.

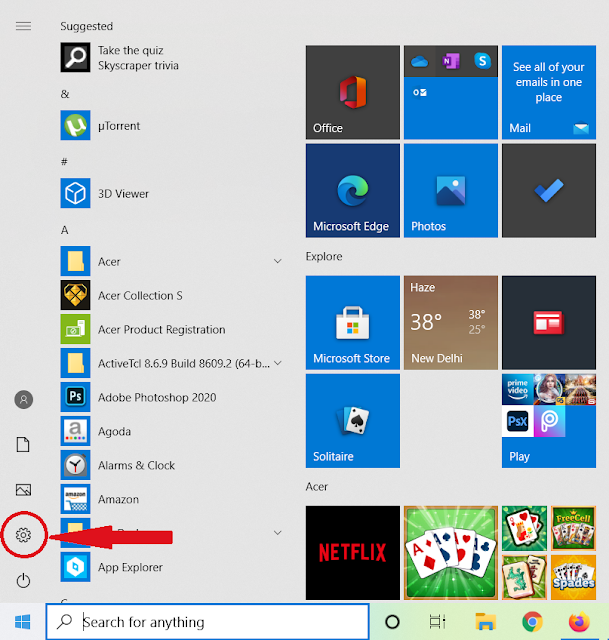
Step 1-> Click on "Start Menu" and click on "Settings" icon.

Settings Option
Step 2->  In the "Settings" panel, click on "Update & Security" option.
Update and Security

Step 3-> Under the "Update & Security" tab, click on "Advanced options". Inside the "Advanced options" tab you will find a "Pause updates" header. Click on the drop down menu and select the farthest date till which updates can be paused. Voila! Your automatic updates will be turned off for a while. As of now the farthest date allowed is one month from the current date. In addition to this turn off all the options available under the "Update options" header.

Advanced Option

2. Turn off "Background Intelligent Transfer Service":

 There's another background process that is responsible for high data consumption in our system. This process uses the idle bandwidth to transfer data. Do the following to check which process is consuming data.

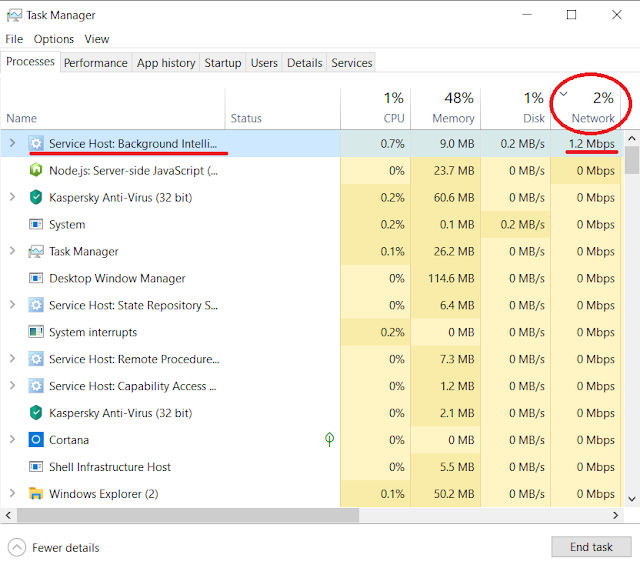
Press Windows key + R and type "taskmgr". Hit enter. The task manager window will pop up. Click on the "network" header (circled in red) to sort the processes in decreasing order of network consumption. If "Background Intelligent Transfer Service" is consuming high amounts of data, it will be there somewhere at the top. An example is shown in the following image.

Task Manager
Now that you have confirmed that "Background Intelligent Transfer Service" is responsible for the consumption of high amounts of data, it's time to turn it off.

To turn it off do the following.

Step 1-> Press Windows key +R. A dialogue box will appear on the screen. Input "services.msc" in the field and press "Enter".

Run Window

Step 2-> A list of services will appear. Scroll down and look for "Background Intelligent Transfer Service".

Windows Services

Step 3-> Right click on it and select "Properties" from the menu. A window will appear. Select "General" tab in the window. Under "General" tab, go to "Startup type" and click on the drop down menu. Select "disabled" to disable this service. Click on "OK" to apply the changes.


Now you can again open the task manager and check the network consumption of different processes. You will find that the data consumption has significantly reduced after disabling the "Background Intelligent Transfer Service".

Above are two methods by which huge amount of precious data can be saved. Do let us know in the comments if it helps you to reduce your data consumption.

Disabled

Hope you liked this tutorial. To learn more about the hacks, internet-related tips and tricks please bookmark our page and visit regularly.

Also read: 


Tuesday, May 11, 2021

How to Remove All Images from Word Document/File At Once | 2021

Office Word Symbol
Microsoft Office Word is a very common tool that most professionals deal with it on regular basis. The bloggers or the content writers use Word on daily basis for writing, drafting, or correcting their contents. As the Word App is equipped with so many in-built features it is so popular from the beginning.

Though the application goes with the name Word we can easily insert images and graphics and work with them. Handling images of different formats like JPEG, PNG, GIF, is super easy in Word. Not only from the local computers or local network even pictures from online can easily be inserted.

In this article, we will show how to insert single or multiple images or remove them one by one or all at once. All the options or settings that will be mentioned here are from Word (2016). We are pretty sure these settings or the options would be almost the same across all versions of Office Word.

How to insert Image:

Click ‘INSERT’ on the top bar >> Pictures/Online Pictures >> <insert single or multiple pictures>

INSERT picture

How to remove a single image:

  1. Click anywhere on the photo that you want to delete.
  2. One box will appear around the selected photo.
  3. Hit the Delete/Backspace button.
  4. The selected photo will be deleted.

Sample Photo

How to remove all images at once:

We will use one of the in-built features of office Word. We will use the well-known ’Find & Replace’ option to perform this task.

  1. Click on the ‘HOME’ tab then find this option called, ‘Replace’. Replace Button
  2. Click on ‘Replace’and the below window will be popped up.
  3. In the ‘Find what’ section type ‘^g’.
  4. In the ‘Replace with’ section keep it blank.
  5. Click on ‘Replace All’

Refer to the picture below:


Replace Window

How this Works?

As we already understood it is working on the principle of ‘Find and Replace’. ‘^g’ is a notation to indicate all the diagrams, graphics, charts, etc. In the ‘Replace with’ section we are keeping that ‘blank’. So when we are hitting on the ‘Replace All’ button all the graphics, charts or diagrams are getting replaced with a ‘black’ that eventually removes the figures.

Drawback:

There is a slight drawback to this process. In this method, all the figures will be removed at once. You cannot selectively remove some of the photos. So if you need to remove all the photos or most of the photos then follow this tutorial. Once, all photos are removed you can insert some of the photos in place of them.

Another Use of his feature:

Let us say you are writing a script and used some small graphics or images to separate paragraphs/chapters from each other. Now after writing 100s of pages if you want to replace that small graphics or images with a new one then follow these steps.

  1. Insert the new image on top of the word document.
  2. Select the new picture and copy it (Ctrl+C or Right Click and Copy)
  3. Open the ‘Replace’ window as before
  4. Now as before give a ‘g’ in the ‘Find what’ section
  5. Put a ‘^c’ in the ‘Replace with’ section instead of blank. Here, ‘^c‘ is the clipboard that holds the new image.
  6. Hit the ‘Replace All’ button and VoilĂ !
  7. Old images are replaced by the new one.

Replace Window 2

Hope you liked this Tutorial guide step by step. To know more about the internet-related tips and tricks bookmark our page and keep visiting it. 

Also read: 

Looking for DeepNude? First Read Here Before Downloading | 2021

Saturday, May 8, 2021

(Part - 1) | August 2021 | Grammarly Premium Access | 100 % Working | 2021

Is Grammarly Free? Or the question should be framed as if there are any Free Grammarly versions available on the internet. Or is there any hack to make Grammarly free for your daily usage?

What is Grammarly?


Grammarly is a well-known Web Browser Extension that helps its users like students, content writers, or professionals in their writing. It is not just a regular spell checker. Grammarly’s advanced versions can correct poorly constructed sentences. It further helps with syntax, accurate phrasal verbs, and numerous writing styles, including a plagiarism checker. Grammarly acts as a proofreader. It is pretty advanced than regular old-fashioned word processors as it helps with the contextual phrasing of any sentence.

How proficient is this?


Grammarly is very much helpful for non-native English users mostly. Though it is suitable for non-technical content writing, it lacks few aspects to understand the technical terms. Grammarly does not interpret the URL links. For instance, if we write Oneplus. In, Grammarly suggests writing the same as Oneplus<dot><space>In as if “OnePlus. In”. It suggests ‘dark mode’ as ‘dark way,’ ‘WhatsApp Status’ as ‘WhatsApp Info,’ ‘phone data’ as ‘phone information,’ and so on.

Is it Free?

                     Free Grammarly Using Cookies Editor Method

Suppose you want to go by website plans, you have to pay for Premium and Business use cases. Grammarly's free version is nothing but a simple spell checker or pointing out silly mistakes like coma, semi-colon, etc.
Grammerly versionOfficially, there are three versions available of it: Free, Premium, and the Business.

Click Button

Let us take a look at what Grammarly says about its pricing and payment. This snippet from Grammarly's official website sums up that.

Pricing Details


To see more about the complete features list, I would suggest you visit the official website itself. You can directly enter from here Grammarly Prices and Plans.

FREE! FREE! FREE!

Now, we have come to this exciting point to show how to use Grammarly's Advanced versions for FREE of cost. This is not clickbait or scam, or phishing. We will share few login credentials which you can use for your personal interest.

We frequently change these passwords, so keep visiting our website and get the latest login credentials for your Grammarly extension. If any login credentials fail to work, please do make a comment. We will get the credentials updated.

Updated: 3rd August 2021


Username Password
me@vdoconferencing.com w#tr8YUj!ksl
usborn@notemypads.com Hs%sayd45Ts
olsen@corpopick.com gjh9RT$ks8dj
reviewnetgatoreader@gmail.com 20132013
contact@avagauthier.com PtJHP99QciWV
get@antoniopearson.com Uq7#OMnrpwyS

Hope you liked these tricks. To know more about these kinds of tips and tricks, keep visiting our website regularly.

Featured Post

Join in Any 18+ WhatsApp Groups(10000+) in A Single Click | 2021

Welcome to this blog. Here, we love to share with you all the internet-related tips and tricks. If you plan to join different kinds of...